Friday, May 20, 2011

Mobile Computing The next computing trends


Being able to work while traveling is essential for every professional these days. That's why laptops have become an essential item. Using the internet on a laptop is also important if one needs to keep in touch with work. Getting wireless internet for your laptop is therefore essential if you are a traveling professional. It is important that if you do so, get a wireless internet capability for your laptop, to get the best possible deal out there and maximize the potential of your computer. Due to the mobility of the laptop, computer users need not to be limited by wires when travelling so wireless internet is very handy. Wireless internet these days is becoming better and faster and almost a necessity for every laptop.

Having wireless internet on your laptop allows the user to conduct their business in a timely and easy manner. Having a wifi internet connection on the laptop for example, makes conducting business much easier. It is becoming increasingly popular as well. Being able to connect to the internet while traveling allows the user to check emails constantly and therefore keep contacts, to have access to information like checking figures, and enhance their productivity. To be able to connect to the internet using a laptop, the computer must have the wireless capability to connect to a router. It is imperative that the laptop must have the right network card with a WiFi connector. There are many public spaces that allow for WiFi connections in every western city. The quality of the connection differs from place to place since it depends on a variety of factors. In general, the quality of the connection depends on the quality of the wireless signal that your laptop receives. Being closer or further from the source of the signal in the end will determine the strength and therefore the quality and possibly the speed of your connection. A WiFi network allows for constant connectivity in all hours of the day and every day of the week. 

Currently, computer and consequently laptop manufactures are investing time and money in enhancing their products networking capabilities and speeds. In the past few years, wireless connectivity has come a long way in terms of quality and strength. When the portable computers were introduced a few years back the notion of the mobile network already existed. Nevertheless, it was not perfected and had many flaws. Over the years however, wireless capabilities have expanded, they have been bettered allowing for greater connectivity, stronger networks, and higher productivity. As a result, and due to the constant technological advancements, laptop users these days can buy the computer and never have to worry about finding a modem, or a router or those inconvenient cables. Just turn on the computer and start surfing the web. Due to the increasing popularity o wireless internet public spaces have been accommodating for this new trend. Public libraries, airports, or even specific businesses provide wireless internet for their customers.
And for if you want to more of it here it is, YOU CAN DO YOUR JOB WHILE STILL YOU ARE IN HOME

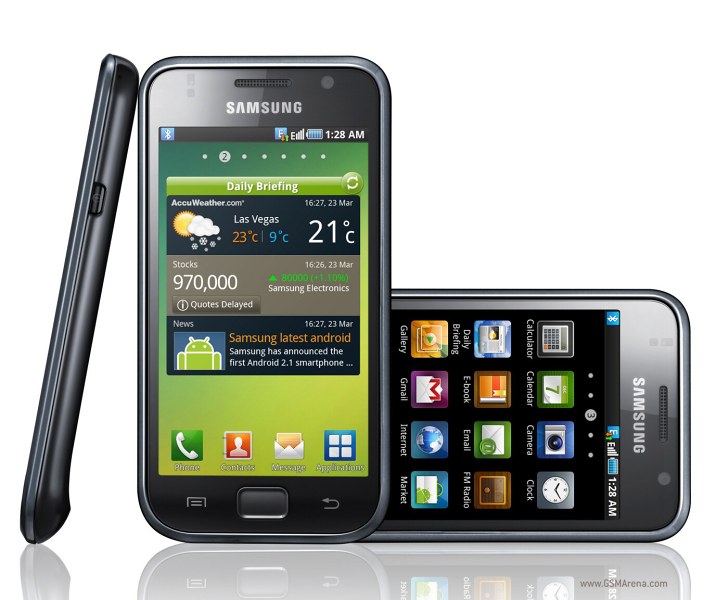
Samsung I9000 Galaxy S Secret code


The I9000 Galaxy S packs a display of the greatest technology that the mobile world has ever seen and a pretty big one at that. With 1GHz Cortex A8 CPU, HD video recording and a sweetly slim waistline make it look like the real deal in the eyes of every real geek.


Features
  • General: GSM 850/900/1800/1900 MHz, UMTS 900/1900/2100 MHz, HSDPA 7.2 Mbps, HSUPA 5.76 Mbps
  • Form factor: Touchscreen bar phone
  • Dimensions: 122.4 x 64.2 x 9.9 mm, 118 g
  • Display: 4" 16M-color Super AMOLED capacitive touchscreen, 480 x 800 pixels
  • CPU: Samsung Cortex A8 Hummingbird 1 GHz processor
  • OS: Android 2.1 (Eclair)
  • Memory: 8/16GB storage, microSD card slot
  • Camera: 5 mega pixel auto-focus camera with face detection and touch focus; 720p video recording at 30fps
  • Connectivity: Wi-Fi, Bluetooth 3.0 with A2DP, standard microUSB port, GPS receiver with A-GPS, 3.5mm audio jack, FM radio
  • Misc: TouchWiz 3.0 UI, built-in accelerometer, multi-touch input, proximity sensor, Swype text input


Here is some secret code/ engineering menu about Samsung I9000 Galaxy S.
Every phone comes equipped with a secret codes where technician can easily access its internal settings and run testing modules. These codes or secret access are usually not specified in the phone manual that comes with it. Here are a Samsung Galaxy S ( and for all its variants Samsung Captivate, Samsung Vibrant , Samsung Fascinate ,  Samsung Epic 4G ) Secret Codes .


Samsung Galaxy S Secret Codes and their meaning


Description Code
for battery and other general settings like GSM/CDMA *#*#4636#*#*
for factory data reset *#*#7780#*#*
for Gtalk service monitor *#*#8255#*#*
for information about phone camera (be very careful hitting options here) *#*#34971539#*#*
change the “Power” button action in your phone. *#*#7594#*#*
service mode *#*#197328640#*#*
testing mode *#0*#
display phones current firmware *#1234#
GPS test *#*#1472365#*#*
network mode/cell info/power info *#0011#
screen test menu *#*#0*#*#*
engineering mode *#7465625#
GPS service menu for JP3 fw *#3214789650#
FACTORY DATA WIPE AND internal SD RESET as soon as you enter # use only if you want wipe your phone *2767*3855#
Opens a File copy screen where you can backup your media files *#*#273283*255*663282*#*#*
View SW Version PDA, CSC, MODEM *#1234#
SW & HW Info *#12580*369#
Service Mode *#197328640#
Ciphering Info *#32489#
Bluetooth Address *#232337#
Bluetooth Test Mode *#232331#
WLAN MAC AWLAN MAC Address *#232338#
WLAN Test Mode *#232339#
Vibra Motor Test Mode *#0842#
Real Time Clock Test *#0782#
Audio Test Mode *#0673#
General Test Mode *#0*#
Diagnostic Configuration *#9090#
Audio Loopback Control *#0283#
TSP / TSK firmware update *#2663#
NAND Flash S/N *#03#
Light Sensor Test Mode *#0589#
Proximity Sensor Test Mode *#0588#
Data Create Menu *#273283*255*3282*#
Data Create SD Card *#273283*255*663282*#
Data Usage Status *#3282*727336*#
Remap Shutdown to End Call TSK *#7594#
Camera Firmware Update *#34971539#
Camera Firmware Menu *#7412365#
Test History *#07#
Auto Answer Selection *#272886#
Quick Test Menu *#7353#
View Phone Lock Status *#7465625#
Configure Network Lock MCC/MNC *7465625*638*#
Note : Playing with these setting might harm your cell. Use them carefully

Wednesday, May 18, 2011

How To Use Symantec Ghost - Save Your Time - Part 2

On the previous article I have shown how to make an Image from Partition now I will show you how to restore this to the partition


Boot your computer from an external device, because you are restoring or replacing the Boot Partition of the computer you don't want it running or the process will not proceed.

Start the Ghost program:

Select image / partition / from image. Sarting the process
Go to the storage drive and select the image with .GHO extension file. Going to the storage drive.
Next select the target drive, note there are two drives here, one is the target drive (top) and the source drive (bottom). Be careful you will over write the storage drive if it is a hard drive! Selecting the correct drive for the image restore.
Proceed? This is your last chance to insure you are on the correct drive, look as the white writing at the lower half of the screen, it tells you about the image file and the target drive. Check the wihte lettering for the correct drive and image file!
Progress indicator, this drive was being imaged from an external USB hard drive, it is slow because the port on the target computer is a ver 1.1 USB port, very slow. Putting the image on the hard drive.
Image now on the target drive, you can restart now or shut down the system and remove the external drive if it is a bootable device. Restart and Enjoy! All done.
If the image is fairly new then your data restore from your back up should go quickly. If the image is pretty old and you had installed software programs since the image was made you will have to reinstall those also. The idea is to make an  image when you feel there has been significant changes to your software programs.

How To Use Symantec Ghost - Save Your Time - Part 1

Making image from partition with Symantec Ghost

There is many users who have the experiences of having Windows Crash and go through the whole process of Windows installation and all other necessary softwares, which could take your several hours or even a days. Not to mention you have lost your precious collections of data, software, wallpapers and so on...

Well worry no more, you can better handle this situation with a simple tool and which will only take time only 10~30 mins(depending on your Image/Backup size) and you will got the full partition as you were saved image made last time using the Ghost software

For this you need to have 
1) The ghost image which contains your Partitions/HDD data (It can be your OS drive or any other drive or even your full Hard Disk)

2)The software, Symantec Ghost as well as your destination Drive/HDD


Below I will explain step by step procedure How to make an image of a partition:


Before you start you will need a couple of things:
1) A bootable device
2) A place to store your image, it should be 10 gig. Larger is better
3) The software, Symantec Ghost.

Preliminarily information:
Note: If you build a DOS boot device or if you use a windows boot device such as ERD or Bart's PE, UBCD, Hiren or what ever. You have two choices when you use Ghost. One is called a DOS command line program - Ghost.exe (16 bit program) and the other is a Windows program called Ghost32.exe (32 bit program). The advantage of ERD or Bart's PE is that they are 32 bit Preinstalled Environment bootable live windows CD or DVD, you will have a Windows type interface.
Once you have your tools, start the system with the bootable device which contains Symantec Ghost. Then start the program Ghost, when it is running the interface is the same, the difference comes with the options. Ghost being a 16 bit DOS program has to conform to DOS constraints. That being the naming convention: 8.3 which means the name can only be eight characters and the extension can only be three characters. Where as Ghost32 is a 32 bit program and the naming convention is the same as any Windows name, 256 characters and any extension you want.
I do stress that if you do not use .GHO for the extension the program will not restore the image when you need to use it!


My version of Symantec Ghost software is about four revision old so the interface will look a little different but the functions are the same.


Start splash screen, this is Ghost32, behind the splash screen is the DOS command line box, If you close the DOS box it will close out the program, leave it open. Click Ok. Symatic Ghost Splash screen
The next screen is the main menu screen. I have opened the menu down to create an image of a partition. The opened the menu down to create an image of a partition.
Once you select your image type the program will open up to your hard drives. Be sure to select the correct drive. If you don't know which drive or are unsure use the Storage manager to get the properties of the drive you want to image. Select your dirve Select the correct drive to makr the image of.
Now you will see all the partitions on the drive, select your partition you are making the image of, here I have selected the C: drive Now select the partition for the image.
Select your storage drive and then name your image. If you are going to make an image of more than one partition name them by the drive letter. I try to use the date of the image, once you have more than two images it is hard to keep track of the latest one. Selecting your storage drive.
Next you need to select how you want the image created, I use High compression because of space constraints, you may have very large storage space and want to create the image in the least amount of time, select Fast. No will not compress the image at all. Select your compresion, High, Fast, No compresion.
Select yes, the image process will start. The completion time will depended on a couple of things:  The size of the data on the partition, the fragmentation of the partition, and the device you are using to store the image. Starting the process.
Creating the image, the top bar is an estimate of completion. The menu will show you amount of data copied and the time elapsed Progress indicators.
Finished


Image completed, don't forget to check it!
Continue or Restart Last screen to check the image select Continue.

Well you have successfully created your Partition image which you can put in other media like DVD, Portable HDD.
On my next article I will explain step by step procedure How to restore an image of a partition

Tuesday, May 17, 2011

7 definite way to SEO


the Internet becomes even more pervasive, the importance of search engine optimization continues to grow.You can make the most of your Internet marketing efforts by following the same steps that top ranking sites do for improving their rankings.You may think that top ranking sites have to spend lots of money to get there.The truth is that sites who come out on top, follow some basic search engine optimization guidelines.These guidelines are easy to follow and often cost little or nothing to put into practice.

1. Manually register your site with DMOZ, also known as the Open Directory Project.The Open Directory Project is the largest, most comprehensive human-edited directory of the Web. It is constructed and maintained by a vast, global community of volunteer editors and feeds other leading web directories.

2. Manually submit your site to Google.If you'd like to wait, Google will eventually spider your site and return it in search result listings related to your site name and keywords.However, this may take some time.For faster inclusion, visit Google and submit your site manually.

3. Purchase a listing with Yahoo! Directory Submit.Yahoo! like Google provides many search products.However, Directory Submit is essential for any business on the web. For a fee of $299 Yahoo! will include your web site in their directory that fuels websites like Yahoo!, MSN and AltaVista.

4. Make sure you are using keywords with a high KEI.This measure takes into consideration both the popularity and competitiveness of your keywords.By focusing on keywords with a higher KEI, you can optimize your chance for search engines to select your site for keywords at little or no expense.


5. Engage in a link building campaign.The more links you have to your site, especially if they have a high Google Page Rank, will signal Google and other search engines that your site is important.A great way to do this is through article submission or affiliate programs.

6. Make your site easily to crawl.Search engine do not like dynamic pages.Although this is changing with the advent of Google Site Maps, it is still important to ensure that all search engines can easily traverse your website.Make sure to use HTML coding and avoid dynamically created pages.

7. Be patient.Once you follow these suggestions, allow search engines time to re-index your site.In the Internet age, we're looking for instant results.However, it does take some time for all of your search engine optimization techniques to take hold.

By implementing the suggestions we've discussed in this article, your search engine optimization efforts can generate positive returns.As the world of search engines continue to evolve, it's important to learn about the latest techniques and requirements for improving search engine results.Continue to focus on SEO. If you do, you'll find yourself at the top of the rankings!

Sunday, April 24, 2011

The World Today - আজকের দুনিয়া: Google fined $5m over Linux patent row...!!!!

Google fined $5m over Linux patent row...!!!!


A judgement by a Texas jury against Google could have major implications for the search giant and the open source world said experts.

LinkWithin

Related Posts Plugin for WordPress, Blogger...