~Default AP/Router Passwords & IP Address ~
Saturday, August 20, 2011
Saturday, July 2, 2011
Hard Drive Data Recovery - Or External Drive Data Backup

Technology has certainly come a long way in the past few decades. Gone are the huge contraptions that used to characterize computers. Nowadays, you can easily purchase a notebook computer that weighs in at less than 6 pounds. However, one thing hasn't changed. Hard drives still occasionally crash and frustrated users are left trying to figure out just how to do hard drive data recovery on their own.
Hard drives aren't perfect, although they're amazing examples of mechanical engineering. Physical damage can easily occur since these disks are spinning at such high speeds. The smallest interference while in use can cause damage in certain areas. Various features have been put into place to reduce the likelihood of a critical hard drive failure, but these are not 100% effective. Sadly, physical damage isn't the only reason why you may need to attempt hard drive data recovery. Many people accidentally wipe out their hard drives because they're not sure what they're doing.
If you do know a good deal about computers, and are not the one who messed up the hard drive in the first place, it may be possible for you to do your own hard drive data recovery. Keep in mind that to do this, you may need to fix your master boot record, or retrieve data from a physically damaged disk. If you can't do this, then you'll need to employ the services of a hard drive data recovery expert. Actually, if your system crashes and you don't actually recover data for a living, I'd suggest you go straight to a hard drive data recovery expert. One thing though…they're expensive. Come on, these guys are specialized in what they do. You didn't really expect that any hard drive data recovery expert would do it for free, did you?
You know what can really help you save money if your hard drive does crash? Backing up your data. It seems like such a sensible thing to do, doesn't it? Some users partition their hard drive. This makes it easy for you to do your hard drive data recovery because chances are only one partition will fail. If you've backed up your files, you can continue working or, better yet, you can save them to an external source and get a new hard drive. You should definitely invest in an external back up. Yes, it's an inconvenience to remember to back up important files, but at least you won't have to pay for a hard drive data recovery expert.
Friday, May 20, 2011
How Do Wireless Networks Work?
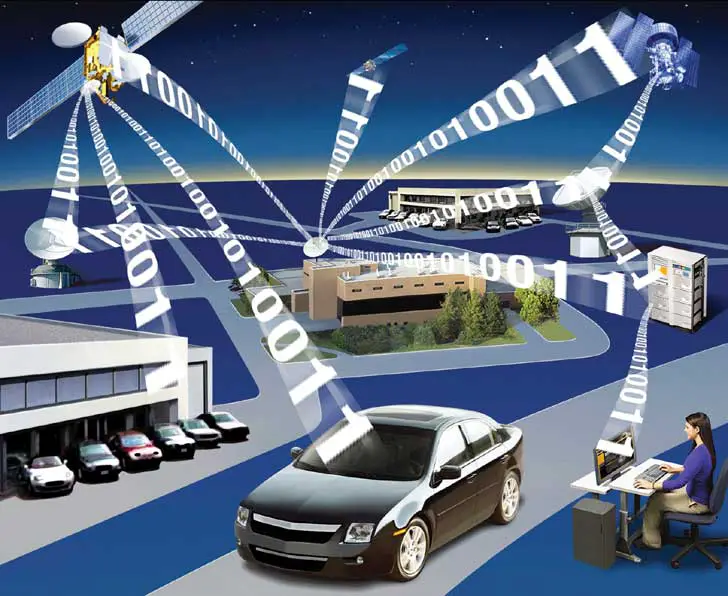
So many of you may be or may not be using some kind of wireless networks, like your cell phones, your broad band router, and the list could go on and on. Actually it is much better to have less cluttering of wires going from here to their and to connect your various devices why not try a simple router to your which can easily connect each of device with same quality? well lets see how this wireless network works.
Wireless networks work using radio waves instead of wires to transmit data between computers. That's the simple version. If you're curious to know what's going on in more detail, then it's all explained in this article.
Ones and Zeros.
I'm sure you know that computers transmit data digitally, using binary: ones and zeros. This is a way of communicating that translates very well to radio waves, since the computer can transmit ones and zeros as different kinds of beep. These beeps are so fast that they're outside a human's hearing range -- radio waves that you can't hear are, in fact, all around you all the time. That doesn't stop a computer from using them, though.
Morse Code.
Don't get nostalgic, nor get bored. The way it works is a lot like Morse code. You probably already know that Morse code is a way of representing the alphabet so that it can be transmitted over radio using a dot (short beep) and a dash (long beep). It was used manually for years, and became a great way of getting information from one place to another with the invention of the telegraph. More importantly for this example, though, it is a binary system, just like a computer's ones and zeros.
You might think of wireless networking, then, as being like Morse code for computers. You plug a combined radio receiver and transmitter in, and the computer is able to send out its equivalent of dots and dashes (bits, in computer-language) to get your data from one place to another.
All About Frequencies.
You might wonder, though, how the computer could possibly transmit enough bits to send and receive data at the speed it does. After all, there must be a limit on how much can be sent in a second before it just becomes useless nonsense, right? Well, yes, but the key to wireless networking is that it gets around this problem.
First of all, wireless transmissions are sent at very high frequencies, meaning that more data can be sent per second. Most wireless connections use a frequency of 2.4 gigahertz (2.4 billion cycles per second) -- a similar frequency to mobile phones and microwave ovens. As you might know, though, a frequency this high means that the wavelength must be very short, which is why wireless networking only works over a limited area.
In addition, wireless networks make use of a technique known as 'frequency hopping'. They use dozens of frequencies in the range they are given, and constantly switch between them. This makes wireless networks more immune to interference from other radio signals than they would be if they only transmitted on one frequency.
Access Points.
The final step is when it comes to all the computers on a network sharing Internet access. This is done using a special piece of wireless equipment called an access point. Access points are more expensive than wireless cards for one computer, as they contain radios that are capable of talking to around 100 computers at the same time, and sharing out access to the Internet between them. Dedicated access points are only really essential for larger networks, though -- if you only have a few computers, it is possible to use one of them as the access point, or you could just get a wireless router.
They Understand Each Other.
That's all well and good, then, but how does wireless equipment made by entirely different companies manage to work together when this is all so complicated? Well, the answer is that there are standards that all wireless devices follow. These standards are technically called the 802.11 (If you like more to read about it just GOOGLE it) standards, and are set by the IEEE (Institute of Electrical and Electronics Engineers). It is thanks to people sticking to their standards that wireless networking is so easy and cheap to use today.
You Need Not to Worry.
If all this talk of frequencies has you a little worried, you don't need to be -- wireless networking hardware and software handles all of this automatically, without you needing to do a thing. Don't think that you're going to have to tell one wireless device what frequency another is using, because it's just not going to happen, alright? Wireless networking, for all its complicated workings, is really far more simple to use than you'd ever expect.
Now Some Techi notes that might be helpful to understand
The cellular phone whether its GSM, EDGE, CDMA, EVDO have frequencies below
| Current / Planned Technologies | Band | Frequency (MHz) |
| SMR iDEN | 800 | 806-824 and 851-869 |
| AMPS, GSM, IS-95 (CDMA), IS-136 (D-AMPS), 3G | Cellular | 824-849 and 869-894 |
| PCS | 1850–1910 and 1930–1990 | |
| 700 MHz | 698-806 | |
| AWS | 1710–1755 and 2110–2155 | |
| BRS/EBS | 2496–2690 |
| Remember that this technology is evolving so fast that now what you know in here it may change in any time for with border aspects, as like now there is 300Mbps or 1000 Mbps wireless devices available | ||
Now common routers works in these frequencies, and you must remember that if your wireless is jamming with other frequencies like signal lost or low speed you may consider your router to reconfigure in different frequencies
WiFi and Router frequencies
Mobile Computing The next computing trends

Being able to work while traveling is essential for every professional these days. That's why laptops have become an essential item. Using the internet on a laptop is also important if one needs to keep in touch with work. Getting wireless internet for your laptop is therefore essential if you are a traveling professional. It is important that if you do so, get a wireless internet capability for your laptop, to get the best possible deal out there and maximize the potential of your computer. Due to the mobility of the laptop, computer users need not to be limited by wires when travelling so wireless internet is very handy. Wireless internet these days is becoming better and faster and almost a necessity for every laptop.
Having wireless internet on your laptop allows the user to conduct their business in a timely and easy manner. Having a wifi internet connection on the laptop for example, makes conducting business much easier. It is becoming increasingly popular as well. Being able to connect to the internet while traveling allows the user to check emails constantly and therefore keep contacts, to have access to information like checking figures, and enhance their productivity. To be able to connect to the internet using a laptop, the computer must have the wireless capability to connect to a router. It is imperative that the laptop must have the right network card with a WiFi connector. There are many public spaces that allow for WiFi connections in every western city. The quality of the connection differs from place to place since it depends on a variety of factors. In general, the quality of the connection depends on the quality of the wireless signal that your laptop receives. Being closer or further from the source of the signal in the end will determine the strength and therefore the quality and possibly the speed of your connection. A WiFi network allows for constant connectivity in all hours of the day and every day of the week.

And for if you want to more of it here it is, YOU CAN DO YOUR JOB WHILE STILL YOU ARE IN HOME
Samsung I9000 Galaxy S Secret code
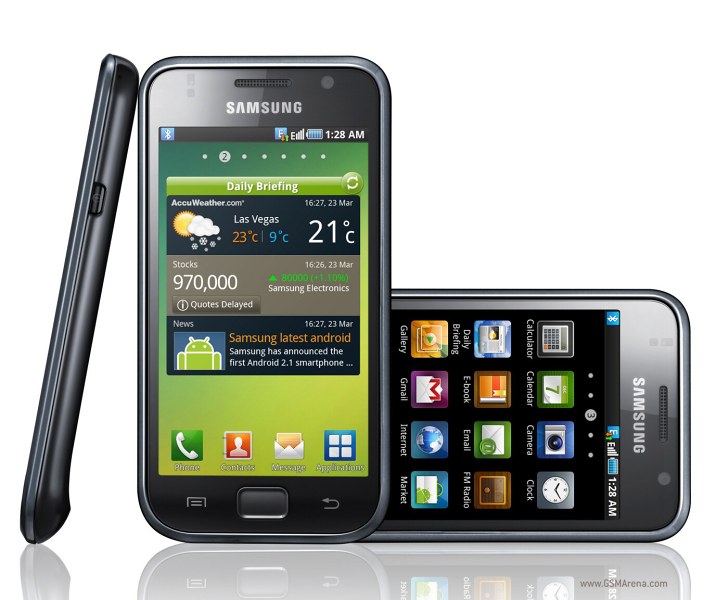
The I9000 Galaxy S packs a display of the greatest technology that the mobile world has ever seen and a pretty big one at that. With 1GHz Cortex A8 CPU, HD video recording and a sweetly slim waistline make it look like the real deal in the eyes of every real geek.
Features
- General: GSM 850/900/1800/1900 MHz, UMTS 900/1900/2100 MHz, HSDPA 7.2 Mbps, HSUPA 5.76 Mbps
- Form factor: Touchscreen bar phone
- Dimensions: 122.4 x 64.2 x 9.9 mm, 118 g
- Display: 4" 16M-color Super AMOLED capacitive touchscreen, 480 x 800 pixels
- CPU: Samsung Cortex A8 Hummingbird 1 GHz processor
- OS: Android 2.1 (Eclair)
- Memory: 8/16GB storage, microSD card slot
- Camera: 5 mega pixel auto-focus camera with face detection and touch focus; 720p video recording at 30fps
- Connectivity: Wi-Fi, Bluetooth 3.0 with A2DP, standard microUSB port, GPS receiver with A-GPS, 3.5mm audio jack, FM radio
- Misc: TouchWiz 3.0 UI, built-in accelerometer, multi-touch input, proximity sensor, Swype text input
Here is some secret code/ engineering menu about Samsung I9000 Galaxy S.
Every phone comes equipped with a secret codes where technician can easily access its internal settings and run testing modules. These codes or secret access are usually not specified in the phone manual that comes with it. Here are a Samsung Galaxy S ( and for all its variants Samsung Captivate, Samsung Vibrant , Samsung Fascinate , Samsung Epic 4G ) Secret Codes .
Samsung Galaxy S Secret Codes and their meaning
| Description | Code |
| for battery and other general settings like GSM/CDMA | *#*#4636#*#* |
| for factory data reset | *#*#7780#*#* |
| for Gtalk service monitor | *#*#8255#*#* |
| for information about phone camera (be very careful hitting options here) | *#*#34971539#*#* |
| change the “Power” button action in your phone. | *#*#7594#*#* |
| service mode | *#*#197328640#*#* |
| testing mode | *#0*# |
| display phones current firmware | *#1234# |
| GPS test | *#*#1472365#*#* |
| network mode/cell info/power info | *#0011# |
| screen test menu | *#*#0*#*#* |
| engineering mode | *#7465625# |
| GPS service menu for JP3 fw | *#3214789650# |
| FACTORY DATA WIPE AND internal SD RESET as soon as you enter # use only if you want wipe your phone | *2767*3855# |
| Opens a File copy screen where you can backup your media files | *#*#273283*255*663282*#*#* |
| View SW Version PDA, CSC, MODEM | *#1234# |
| SW & HW Info | *#12580*369# |
| Service Mode | *#197328640# |
| Ciphering Info | *#32489# |
| Bluetooth Address | *#232337# |
| Bluetooth Test Mode | *#232331# |
| WLAN MAC AWLAN MAC Address | *#232338# |
| WLAN Test Mode | *#232339# |
| Vibra Motor Test Mode | *#0842# |
| Real Time Clock Test | *#0782# |
| Audio Test Mode | *#0673# |
| General Test Mode | *#0*# |
| Diagnostic Configuration | *#9090# |
| Audio Loopback Control | *#0283# |
| TSP / TSK firmware update | *#2663# |
| NAND Flash S/N | *#03# |
| Light Sensor Test Mode | *#0589# |
| Proximity Sensor Test Mode | *#0588# |
| Data Create Menu | *#273283*255*3282*# |
| Data Create SD Card | *#273283*255*663282*# |
| Data Usage Status | *#3282*727336*# |
| Remap Shutdown to End Call TSK | *#7594# |
| Camera Firmware Update | *#34971539# |
| Camera Firmware Menu | *#7412365# |
| Test History | *#07# |
| Auto Answer Selection | *#272886# |
| Quick Test Menu | *#7353# |
| View Phone Lock Status | *#7465625# |
| Configure Network Lock MCC/MNC | *7465625*638*# |
Note : Playing with these setting might harm your cell. Use them carefully
Wednesday, May 18, 2011
How To Use Symantec Ghost - Save Your Time - Part 2
On the previous article I have shown how to make an Image from Partition now I will show you how to restore this to the partition
Boot your computer from an external device, because you are restoring or replacing the Boot Partition of the computer you don't want it running or the process will not proceed.
Start the Ghost program:
| Select image / partition / from image. |  |
| Go to the storage drive and select the image with .GHO extension file. |  |
| Next select the target drive, note there are two drives here, one is the target drive (top) and the source drive (bottom). Be careful you will over write the storage drive if it is a hard drive! |  |
| Proceed? This is your last chance to insure you are on the correct drive, look as the white writing at the lower half of the screen, it tells you about the image file and the target drive. |  |
| Progress indicator, this drive was being imaged from an external USB hard drive, it is slow because the port on the target computer is a ver 1.1 USB port, very slow. |  |
| Image now on the target drive, you can restart now or shut down the system and remove the external drive if it is a bootable device. Restart and Enjoy! |  |
How To Use Symantec Ghost - Save Your Time - Part 1
Making image from partition with Symantec Ghost
There is many users who have the experiences of having Windows Crash and go through the whole process of Windows installation and all other necessary softwares, which could take your several hours or even a days. Not to mention you have lost your precious collections of data, software, wallpapers and so on...
Well worry no more, you can better handle this situation with a simple tool and which will only take time only 10~30 mins(depending on your Image/Backup size) and you will got the full partition as you were saved image made last time using the Ghost software
For this you need to have
1) The ghost image which contains your Partitions/HDD data (It can be your OS drive or any other drive or even your full Hard Disk)
2)The software, Symantec Ghost as well as your destination Drive/HDD
Below I will explain step by step procedure How to make an image of a partition:
1) A bootable device
2) A place to store your image, it should be 10 gig. Larger is better
3) The software, Symantec Ghost.
Preliminarily information:
Note: If you build a DOS boot device or if you use a windows boot device such as ERD or Bart's PE, UBCD, Hiren or what ever. You have two choices when you use Ghost. One is called a DOS command line program - Ghost.exe (16 bit program) and the other is a Windows program called Ghost32.exe (32 bit program). The advantage of ERD or Bart's PE is that they are 32 bit Preinstalled Environment bootable live windows CD or DVD, you will have a Windows type interface.
Once you have your tools, start the system with the bootable device which contains Symantec Ghost. Then start the program Ghost, when it is running the interface is the same, the difference comes with the options. Ghost being a 16 bit DOS program has to conform to DOS constraints. That being the naming convention: 8.3 which means the name can only be eight characters and the extension can only be three characters. Where as Ghost32 is a 32 bit program and the naming convention is the same as any Windows name, 256 characters and any extension you want. I do stress that if you do not use .GHO for the extension the program will not restore the image when you need to use it!
My version of Symantec Ghost software is about four revision old so the interface will look a little different but the functions are the same.
| Start splash screen, this is Ghost32, behind the splash screen is the DOS command line box, If you close the DOS box it will close out the program, leave it open. Click Ok. |  |
| The next screen is the main menu screen. I have opened the menu down to create an image of a partition. |  |
| Once you select your image type the program will open up to your hard drives. Be sure to select the correct drive. If you don't know which drive or are unsure use the Storage manager to get the properties of the drive you want to image. Select your dirve |  |
| Now you will see all the partitions on the drive, select your partition you are making the image of, here I have selected the C: drive |  |
| Select your storage drive and then name your image. If you are going to make an image of more than one partition name them by the drive letter. I try to use the date of the image, once you have more than two images it is hard to keep track of the latest one. |  |
| Next you need to select how you want the image created, I use High compression because of space constraints, you may have very large storage space and want to create the image in the least amount of time, select Fast. No will not compress the image at all. |  |
| Select yes, the image process will start. The completion time will depended on a couple of things: The size of the data on the partition, the fragmentation of the partition, and the device you are using to store the image. |  |
| Creating the image, the top bar is an estimate of completion. The menu will show you amount of data copied and the time elapsed |  |
| Finished |  |
| Continue or Restart |  |
Subscribe to:
Posts (Atom)